Tuesday, October 2, 2012

Give Me A New Coat


Nice? I’m so glad it’s finally over! I gave my doors a nice coat of glossy paint.


Many tell me painting the door is tough and it’s different from painting the walls. Door paints (for wood and metals) for the fact is oil based, which also means:
  • You need to handle it faster than water based paints. Once it reaches the semi dried state, you won’t want to brush through it.
  • It “bleeds” at the corners (I’ll show you how to minimize that).
  • It’s messy and sticky
  • The fumes are suffocating (it’s best you work in a well-ventilated place).
  • To clean off any stains, you’ll have to use turpentine, which I find it quite damaging to my skin (advisable to use gloves handling this)
Well, it is tough, because I had to paint all 11 doors… :(
I can only manage 3 doors + frame in one day. Plus I took breaks in between before completion. I tried painting 2 days in a row, I ended up with muscle cramps in my fingers and a sore wrist!

In short, if you have newly polished parquets like mine, you’ll avoid all cost to step on the drips of paint from your prepared surface onto your floor. Cleaning it when it has fully dried is quite a time consuming task. Amidst the chaos, you’ll have to act fast to reduce visible brush strokes setting on your door… a lot to juggle right?

Let’s begin…..

Tools you’ll need:


Super must haves:
1)      Short haired roller sponge
See the sponge next to the gloves? This is the number #01 must haves in my list of door painting. Make sure it is the short haired types. It’s quite hard to find and most hardware shops sell only the standard ones. Also, buy a bunch of them. I never wash and reuse them because you’ll need to use a lot of turpentine to clean it, plus it’s a hassle to dispose the turpentine.
2)      Plenty of disposable gloves
3)      Natural haired paint brushes (works better than nylon ones)
4)      Odour-lite door paint (I’ve tried using the standard wood paint. I’ve not seen odourless types in the market though. Boy, the fumes were unbearable & I feel dizzy after breathing in the fumes for the whole day)

You’ll need lots of prep work as well:


Make sure you tape vital areas and protect the surface of your floors.


Take note if you use newspapers, have it thick enough so that the paint won’t seep through. Remember, it’s not like wall paint.


Get rid of any peeling paint, stickers, and stains by sanding that off lightly. If you want, you can also give your door a wipe before painting (I did for mine).

After painting, make sure to leave the tape 1-2 days at the corners to completely dry and stop the “bleeding” process. Look at the screw up of my first painted door. I didn’t expect the “bleeding” to continue after 1-2hrs of painting, but it seems like it did. It’s still there and I’m having a hard time removing it.


Some pointers when painting doors:
1)      Take out excess paint from your brush before painting
a.       This will reduce dripping paint onto the floor
b.      It reduces “bleeding”
2)      You’ll need 2 coats to have an even colour. If the base of your door is a dark colour, you may need 3 or more coats. It’ll be better is you can sand down the door a little, but I’m too lazy to do so. Just make sure that coat 1-2 is completely dried before putting on the 3-4 coats.
3)      While painting the 2nd coat, check on “bleeding” at corners & brush them off lightly before it dries.
4)      Always wear gloves! In my first attempt, I didn’t despite my mum telling me. I had paint all over my hands and soles of my feet! Best part was, I forgot about it and touched other things in the house!!! It became a mess!
5)      If you accidently drip/ stain places where you don’t want the paint to be, get a ragged cloth and quickly clean it while it’s still in its liquid form. (In the picture above, I’m really having a hard time as the paint has already dried. Smart me thought I could use the scrapper to scrape it out… I just made it worse!)

I always paint the areas which my roller sponge cannot reach with a brush first. Like the frame, patterned areas of the door and corners. My record is painting 3 doors a day, so I’ll make sure to maximize the use of my sponge rollers.  I didn’t wait for the paint to dry before painting on the second coat. The roller sponge is good as it doesn’t leave brush patterns on the door. It also gives an even coat of paint without much dripping and splashing droplets of paint out (provided you roll out the excess).


I’m pretty happy with the results. It feels like having a new shiny door now!

If you’re attempting it, try out my method and take note on the pointers. I screwed up 2 doors before getting it right. Lastly, you really need a lot of patience. In my opinion, painting the doors take more effort than the wall.

Good luck!


Saturday, September 22, 2012

Stoney Love


Our first guest on our new dining table! This cheeky baby lizard has been around the house since...


Choosing our dining table had been a hard job when we have thoughts of getting a chandelier. From our love-at-first-sight for a one piece hard wood table, we changed our minds when we thought of how the crystal chandelier wouldn't fit the wooden table. At the end, we decided on a stone table.

Yes, a stone table. I know marble tables are expensive however, I didn't know that they are that pricey! (I mean it's OK just as long as it's under by allocated budget) Then we started looking at another option - Granite.

A trick question: Is Marble or Granite more expensive?

Before research, my answer was Marble is more expensive. Close friends and family whom I have asked also said the same thing, BUT, it is all a perception! Granite is just as pricey as Marble! Plus, since Granite is a harder material, it also means that it needs more workmanship = more $$.

We spent a few weekends going to & fro the stone factory looking and confirming the stones we have choosen, then bringing the samples back to imagine how the different colours would fit the dining area. This process took us close to a month.


Finally! We chose a black granite slab - Russian Volga Blue. Granite is more hardy and not as porous as Marble. I'm quite a lazy person, so the lesser work to care for the better. This selection turns out slightly more costly than the initial marble slab that we have chosen.   XO

And the whole table weighs a whopping 360kg or more!! Had 4-5 men handling the delivery of it.

 First step: Table base
This table is not designed for lifting. You definitely need assistance from these suction handles at all four corners!! 

Cleaning the inside before the final step.  
 Whoa, super heavy! It's 160kg!!

Table is ready!

Well, I'm waiting for the delivery of our dining chairs. It should be ready in mid-Oct. This is how our chairs will look like:


Our dining room is almost done. We bought 6 cream and 4 black ones. The table is a 8-seater, but we bought two extra in case for guests. The extras will be used in our rooms. :)

I can't wait to see how it fits the whole look! 

Look out for my updates!


xxx


Tuesday, September 11, 2012

Dress Me Up (Part 2)

I'm back to continue the lamp shade. :) After measuring the base circumference of the lamp shade, I realized that 1 meter of organza is not enough. So my head seamstress had to halt this project till we buy enough fabric. *Sigh*

BUT, I've sewn on the crystals onto the shades (recap, I've bought 2 of these floor lamps). I'll show you the process. Just make sure to get working leather gloves, thick needles for upholstery purposes and a ball of strong thread.

Let's start.


I started off by laying out the pattern and colour assortment sequence per pane on the table. After, I measured and placed markings on the shade. For each pane, I had 7 (middle) + 1 + 1 (both ends of pane)
 Tie a knot and start on a new marking. (I'm continuing mine in this picture)
Slot in your crystal beads.
Pull it tight and snug to the frame.
 Make another round.
Secure with another stitch. The shade fabric has 2 layers, note when doing this, make sure that your thread goes in-between the layers to hide the thread. 
 Out on the next marking and repeat the process.
 On the underside, it looks like this. Clean looking with just the stitch.
The end result!

My hands were a little sore from pulling & pushing the needle onto the lamp shade. As this is 2nd hand, the hardened glue on the edges of the shade makes it even tougher. That's why I need the aid of the leather gloves. If not, the needle will go through my hands.

Ok, last step will be to put on the fabric. 

Stay tuned for part 3! 


Monday, September 10, 2012

Shady Affair (Part 1)

I've wanted to put this post up for some time but I was just too lazy to pull these out from my stash of chaos (junk) piled up in my cupboard. The paint work and lots of cleaning was just an excuse, but I finally did it!!

Tada!


I got these during my holiday trip to Spain in July this year. I was so inspired by this lady who did her own Victorian lamps for sale online, so I decided to attempt doing it for my room since my theme is French/Victorian. Hers are very detailed and ornate, hence, commanding a high price. I fell in love with it immediately. Because it is a lot of handy work, the lamp is an art piece on its own. Take a look:

Victorian lamps are all about the shades and the antique body.

In Singapore, such lamps are hard to find, even if you can find one, it may not be the one you like and it cost a lot. Else, it will be a replica where they use cheap materials to produce which I didn't like the effect too. Naturally, I was in a fix. Where to find all these materials? First things first, I had to find the lamp body. So since I was in Europe, might as well look for it. 


I was in Paris earlier and dropped by the Saint Ouen flea market. I read that they sell lots of old antique French furniture there. It was an eye opener, however, it was a disappointing trip. Don't be fooled by the word "Flea Market". It's pretty pricey! It'd be best you brought along a local who can show you around and speak the language, if not, I think the chances of being cheated is high.

I ended up not buying anything, not only it is expensive, I'm unsure if the item is genuinely antique or not.

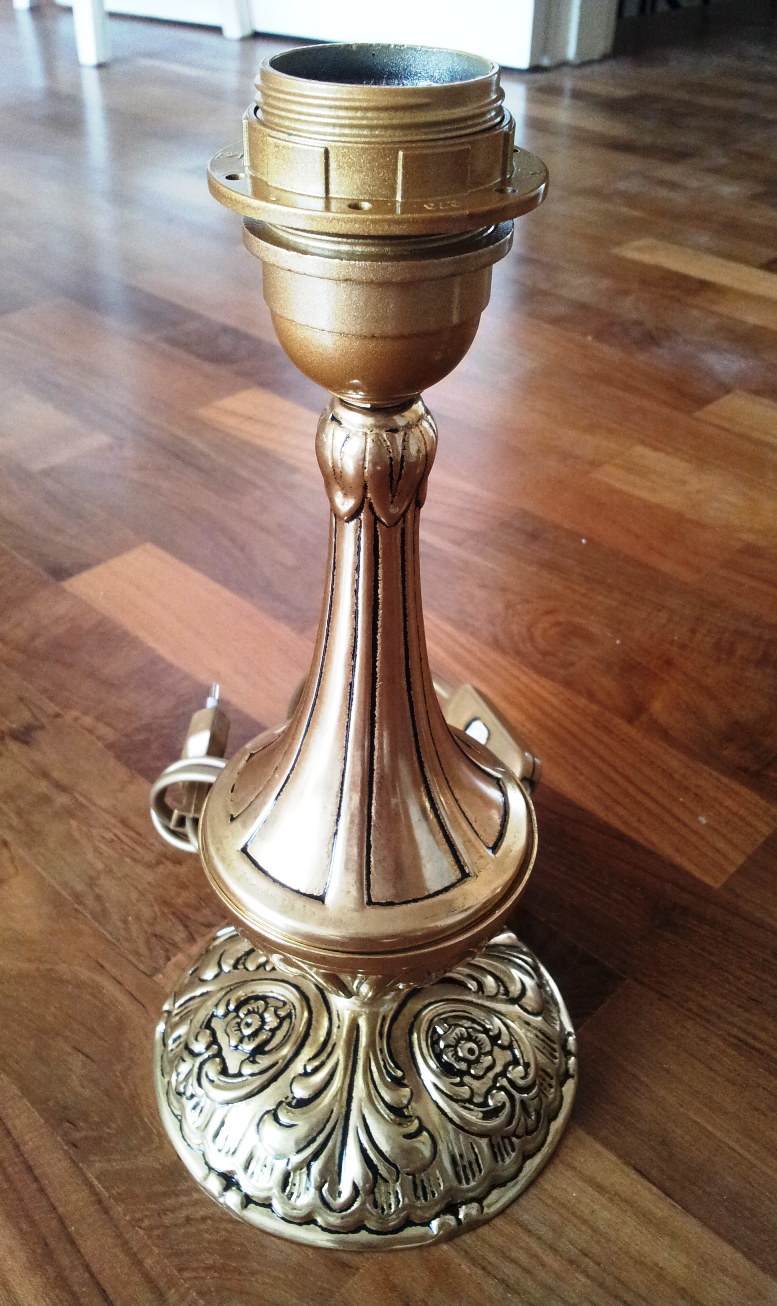
Then, in one of the day trips in Segovia-Madrid, I found it! It wasn't that antique looking, but it is made of brass. The design is Victorian enough and it doesn't cost a fortune.

Phew!

Lamp DIY Check List:

  • Brass Body (bought!)
  • Victorian lamp shades
  • Beads
  • Fabric
  • Laces & Embroidery

Now on to the question, "Where to get Victorian lamp shades?" Well, I'm still looking out for these. I hope to get it in Singapore or Malaysia. Last choice will be from the internet (straight from lamp shade suppliers) because you usually have to buy a minimum quantity.

Basically, the rest of the items should be easy to get unless you want exotic laces/ fabrics and ready made embroidery patterns. 

*Sigh* I'll keep you posted when I find the treasure. X'O


Sunday, September 9, 2012

Monkey Business (Part 2)

The scaffolds are off!! My electrician came to fix the support for the chandelier and my feature wall is finally done! :)

My contractor really did a great job in concealing the wire. The wall that I painted the wallpaper paint is where the hacking & plastering took place. The wire went all the way up, he cut two holes in the ceiling board and plastered it up. I was afraid that they will use the conduit along the ceiling board, it's good that they didn't use that method. Smart!

View from 1st floor
View from 2nd floor

Scaffold removing process:

It's tricky at the top as they need to turn in different angles to get the metal planks & long pieces of wood down. You don't want these to bang and hit your newly painted walls right? 

This time, the scaffolding took half the time to be removed. The aftermath is another tiring job... Cleaning! 

X'O

Tuesday, September 4, 2012

Monkey Business (Part 1)

Ok, my scaffolding came on the 31 Aug. I was thinking that it was the metal type but it's wooden scaffolds. Initially I thought that it wasn't that stable... Boy, I was wrong. It's really solid. What really impressed me was that the people who put the scaffold together were old uncles. They are really fit!!


See the wallpaper paint that was done halfway on first floor? That's what I got the scaffold for. To continue all the way up and to install a chandelier. 

I always thought that we have the luxury to see and wait before deciding what to do. When the construction was going on (laying of floor tiles), we thought, " Shall we do the extension for the 2nd floor or shall we not?". After much "thinking" (after when the construction ended), we decided to scrap the idea and install a chandelier instead.

Word of advise - get all your hacking and dirty works done way before your painting, doing the final stuff and having all your new furniture in your place. I was so worried that our new floor tiles would be scratched by the debris from the hacking to conceal the wiring and worst of all, the DUST & Wood shavings (from the scaffold)!!! OMG, it was everywhere and I had a hard time cleaning it up! I hate the mess and I'm highly allergic to super dusty places.  X(


Ok, that's me now painting the wallpaper paint. I'm not the least afraid of heights, but I'm afraid if I fall. There's safety gear, but it's just a safety line attached to my hips and onto the scaffold. At times I have to stand at the wooden joining at the edge to reach difficult places.

My mum took a picture of me from first floor. I feel like a monkey, climbing up and down the scaffold. The hardest part was the top extreme edges of this panel. That being said, I had a good work out of sit ups, yoga and squats today.

Stay tuned for the final picture of result when the scaffolds are removed!   ;)


Saturday, September 1, 2012

French Connection

Some of my French style, small furniture has arrived. I'm so excited!

The best part is, I got them at a very good price and they look good too!