Monday, September 10, 2012

Shady Affair (Part 1)

I've wanted to put this post up for some time but I was just too lazy to pull these out from my stash of chaos (junk) piled up in my cupboard. The paint work and lots of cleaning was just an excuse, but I finally did it!!

Tada!


I got these during my holiday trip to Spain in July this year. I was so inspired by this lady who did her own Victorian lamps for sale online, so I decided to attempt doing it for my room since my theme is French/Victorian. Hers are very detailed and ornate, hence, commanding a high price. I fell in love with it immediately. Because it is a lot of handy work, the lamp is an art piece on its own. Take a look:

Victorian lamps are all about the shades and the antique body.

In Singapore, such lamps are hard to find, even if you can find one, it may not be the one you like and it cost a lot. Else, it will be a replica where they use cheap materials to produce which I didn't like the effect too. Naturally, I was in a fix. Where to find all these materials? First things first, I had to find the lamp body. So since I was in Europe, might as well look for it. 


I was in Paris earlier and dropped by the Saint Ouen flea market. I read that they sell lots of old antique French furniture there. It was an eye opener, however, it was a disappointing trip. Don't be fooled by the word "Flea Market". It's pretty pricey! It'd be best you brought along a local who can show you around and speak the language, if not, I think the chances of being cheated is high.

I ended up not buying anything, not only it is expensive, I'm unsure if the item is genuinely antique or not.

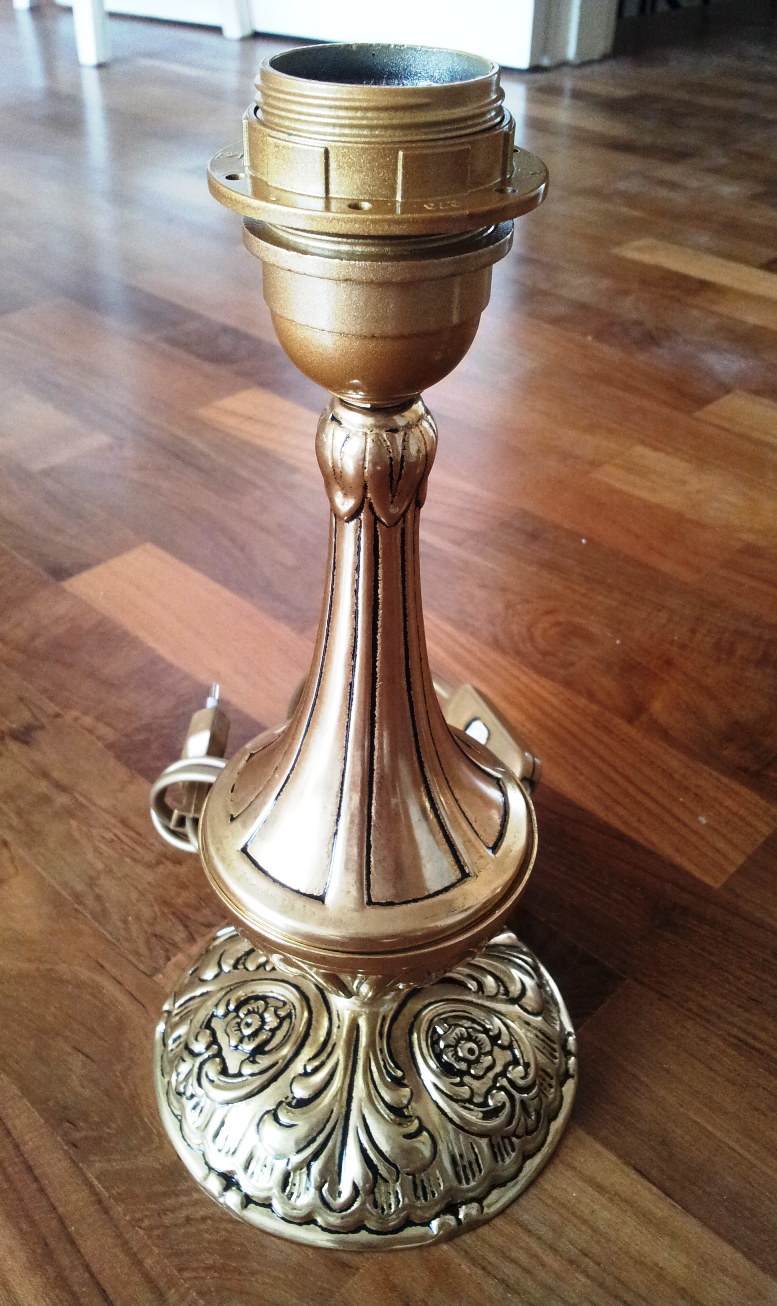
Then, in one of the day trips in Segovia-Madrid, I found it! It wasn't that antique looking, but it is made of brass. The design is Victorian enough and it doesn't cost a fortune.

Phew!

Lamp DIY Check List:

  • Brass Body (bought!)
  • Victorian lamp shades
  • Beads
  • Fabric
  • Laces & Embroidery

Now on to the question, "Where to get Victorian lamp shades?" Well, I'm still looking out for these. I hope to get it in Singapore or Malaysia. Last choice will be from the internet (straight from lamp shade suppliers) because you usually have to buy a minimum quantity.

Basically, the rest of the items should be easy to get unless you want exotic laces/ fabrics and ready made embroidery patterns. 

*Sigh* I'll keep you posted when I find the treasure. X'O


Sunday, September 9, 2012

Monkey Business (Part 2)

The scaffolds are off!! My electrician came to fix the support for the chandelier and my feature wall is finally done! :)

My contractor really did a great job in concealing the wire. The wall that I painted the wallpaper paint is where the hacking & plastering took place. The wire went all the way up, he cut two holes in the ceiling board and plastered it up. I was afraid that they will use the conduit along the ceiling board, it's good that they didn't use that method. Smart!

View from 1st floor
View from 2nd floor

Scaffold removing process:

It's tricky at the top as they need to turn in different angles to get the metal planks & long pieces of wood down. You don't want these to bang and hit your newly painted walls right? 

This time, the scaffolding took half the time to be removed. The aftermath is another tiring job... Cleaning! 

X'O

Tuesday, September 4, 2012

Monkey Business (Part 1)

Ok, my scaffolding came on the 31 Aug. I was thinking that it was the metal type but it's wooden scaffolds. Initially I thought that it wasn't that stable... Boy, I was wrong. It's really solid. What really impressed me was that the people who put the scaffold together were old uncles. They are really fit!!


See the wallpaper paint that was done halfway on first floor? That's what I got the scaffold for. To continue all the way up and to install a chandelier. 

I always thought that we have the luxury to see and wait before deciding what to do. When the construction was going on (laying of floor tiles), we thought, " Shall we do the extension for the 2nd floor or shall we not?". After much "thinking" (after when the construction ended), we decided to scrap the idea and install a chandelier instead.

Word of advise - get all your hacking and dirty works done way before your painting, doing the final stuff and having all your new furniture in your place. I was so worried that our new floor tiles would be scratched by the debris from the hacking to conceal the wiring and worst of all, the DUST & Wood shavings (from the scaffold)!!! OMG, it was everywhere and I had a hard time cleaning it up! I hate the mess and I'm highly allergic to super dusty places.  X(


Ok, that's me now painting the wallpaper paint. I'm not the least afraid of heights, but I'm afraid if I fall. There's safety gear, but it's just a safety line attached to my hips and onto the scaffold. At times I have to stand at the wooden joining at the edge to reach difficult places.

My mum took a picture of me from first floor. I feel like a monkey, climbing up and down the scaffold. The hardest part was the top extreme edges of this panel. That being said, I had a good work out of sit ups, yoga and squats today.

Stay tuned for the final picture of result when the scaffolds are removed!   ;)


Saturday, September 1, 2012

French Connection

Some of my French style, small furniture has arrived. I'm so excited!

The best part is, I got them at a very good price and they look good too!

Tuesday, August 21, 2012

Dress Me Up (Part 1)

Remember this?

 
I wanted to do a face lift for this. Bought a huge bag of crystal parts from Hock Siong & Co at dirt cheap prices and organza fabric. My mum's the master seamstress, so I did the ground work to piece the crystals together.


Yes, I even put them in sequence how it should hang from each pane.

Unfortunately, my head seamstress is pretty busy these days at work, so the operation has been halted till she feels like doing it. Well, the plan is to sew these crystals along the edge of the lamp shade and to cover the shades with a sewn organza outer piece with pleats.

I'll keep you posted once we start on it again!


Saturday, August 18, 2012

Take a Second Look

Ever since my mum passed me a newspaper cut out from The Straits Times on 2nd hand furniture shops, one of my favourite hang out places to look see look see is Hock Siong & Co. Their furniture is relatively in good condition and most of them are old furniture from Hotels. So the quality is there too. 


They do re-painting, however they don't do re-upholstery. Good thing is, they have contacts which they usually recommend to customers and their staff are really helpful. Also,with $300 spent, they'll do delivery to your door step. 

I've already went there more than 5 times in a span of 2 months. My initial idea was to find antique French/ Victorian furniture and re-upholster it. I ended up getting overly excited and bought other stuff too. I mean, the quality's not bad for the price paid, add a little sanding, painting, polishing & cleaning, the piece looks new again. Why not?

Check out my great hauls...


We bought 3 of these. I was so busy then shopping for suitable fabric prints and upholsterers.


Somehow I fell in love with this dirty looking 3-seater. It has a matching single seater, but after much "thinking", it was sold to someone else. :(  I wanted something Victorian for our bedroom, so this fits right into the theme. 

This will be my project - to re-upholster myself! My mum snorted & laughed. She said she'll laugh harder when I finally send this piece to the upholsterer... after my disastrous attempt.... We'll see about that.

Stay tuned for my DIY upholstery post!  

Bought 2 of these and 2 other shorter ones.


The best part is, I got all of these for about $1000. Don't forget to include costs for fabrics, re-painting & upholstery. 

Most of the hauls you see above, they all need some form of face uplift. I'll keep you posted when I've started on of each one of them. I reckon the hardest one will be the 3-seater. Wish me luck!


Friday, August 3, 2012

Wallpaper Alternative

There's the craze about Wallpapers now. I chose two types for two rooms and decided to try this Wallpaper paint for the remaining room & hall.  Actually, the savings is quite a lot. It's more than 70% savings from the cost of the Wallpaper.

The Wallpaper paint comes in a full set of Primer, Top Coat and Kit set. 


Honestly, I feel that the kit set is a waste of money. It's just a jumbo ice-cream stick for stirring the paint, a plastic scraper and a nylon paint brush. You can easily substitute the stirrer with any long scrap wooden stick. As for the plastic scraper, a hard plastic sheet can easily do the trick and for the nylon brush, just make sure to get a short, stiff one. 

I included some safety gear and other tools that are used to prepare the wall.

Yes, there's an idiot's guide how to DIY that comes with the kit. It's surprisingly easy.

Step 1: Apply 2 coats of Primer & allow to dry for 2hrs
Step 2: Apply top coat using criss-crossed strokes
Step 3: After 15min, use spatula to smooth over semi-dried coat (be gentle on this, on my first try I ended up with scratch marks OR best, just omit this part)

One coat of primer is good enough unless your previous wall colour is an intense colour, you'll need two coats of primer to cover that. For mine, I used just one coat. After drying for 2hrs, I continued with the top coat.


Walla! My completed project.


I find that one coat of Top Coat is good enough. 1 coat of primer + 1 coat of top coat give a very good contrast and texture. It's my first project and I wanted a perfect wall, so I did two coats of top coat. 

The second coat made the colour more intense and covered up most of the contrast. I was a little disappointed, however lucky for me, this room is very bright and the sunlight brought out the shine from the metallic parts of the paint.

If I knew that this paint will give such an effect and cost just a fraction, I would not have chosen Wallpaper. You can save quite a lot. It took me a day to do this by myself. Well, my other half is especially anal about doing a good job "preparing" the wall. So that the paint will stay and last longer... yes, yes, I got it. So, much of my time is devoted in "preparation".

I'm happy with the end result. :))